Workshop updates

Fiddle bowing with a flexible wrist

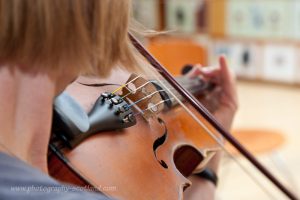
Playing fiddle bow strokes with a flexible wrist

Tonight we focused on playing our fiddles with a relaxed and flexible wrist in our bowing arms. We got into pairs and one person played the reel Lay Dee at Dee, while the other held their elbow steady. This pushed us to use the wrist more in moving the bow. One person then held the bow steady in front their partner, so they could move their bowing hand up and down the shaft of the bow, paying particular attention to keeping the wrist supple. The wrist is effectively ‘leading’ the bow’s stroke. As we reach the end of the bow, the wrist leads the change from an up bow to a down bow, so when the arm is still travelling up at the end of the bow stroke, the wrist is already starting to bend to change the bow to a down bow.

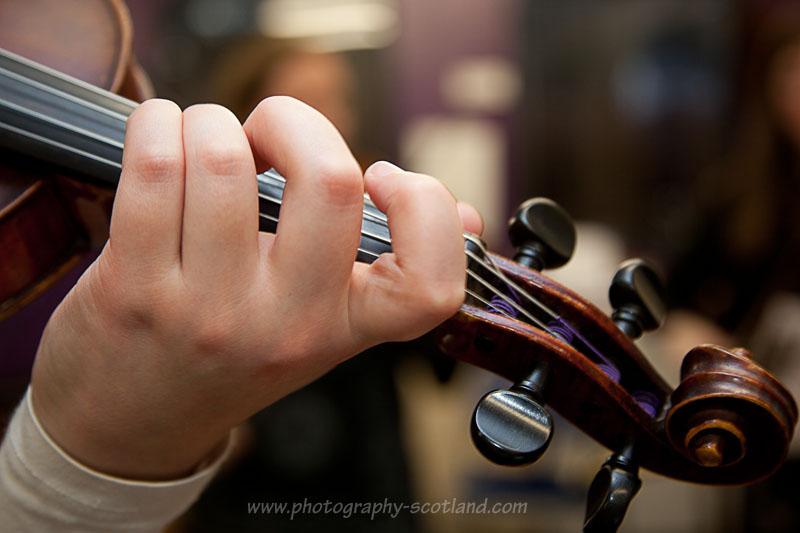
We then played through the B part of Lay Dee at Dee, and worked on using our wrist action in the section of the tune which crosses from the E string to the A string and back. With a flexible wrist, it’s possible to use a clockwise circular motion with the hand to keep the bow moving from one string to the other. This will allow us to have much cleaner control over the bow, so we can play the notes more crisply, and have more precise control over our timing. It will ultimately help us to be able to play the tune faster.

After this we worked on our technique for playing percussive chords in the B part of Braeroy Road. We were using the open D string to play a note and octave below the Ds in the tune. We bowed the C# before the D on an up bow, and moved up close towards the heel of the bow. We then allowed the weight of the tip of the bow to drop the bow onto the open D string as we played the D in the tune on a down bow. We spent some time practicing using our index finger to push into the stick of the bow, using the added pressure to create a chord on the adjacent string. We tried this out while playing an F# on the D string (2nd finger), using the open A string to create the chord. We also worked on playing this chord in the B part of Bill Sullivan’s polka.

How to develop a flexible wrist action for bowing when playing the fiddle
Photo @Ros Gasson 2013

To finish off, we reminded ourselves of the steps for learning to play the fiddle with vibrato. Practicing this for a few minutes each day will help to build muscle memory for the vibrato action, making it easier to integrate it into tune playing.

At the end of the class we played trough the Shetland Molecule together.

How to control the fiddle bow

How to control the fiddle bow

Tonight we spent some time working on our bow holds, and how to control the fiddle bow when playing chords, or adding dynamics to a tune.

We started the evening by learning the jig Braeroy Road (which is also known as Barney from Killarney). It’s a jig that works well played at a slow and mellow speed. Once we’d learnt the notes, we looked at some of the ornamentation we could add into the tune. We can add simple grace notes (played with either the 2nd or 3rd finger) on the long A and E at the beginning of the tune. There’s also enough time to play a roll on either of those notes if you prefer. You can read more information on playing rolls in this previous post on bowing patterns and grace notes.

How to control the fiddle bow when playing tunes
Photo ©Ros Gasson 2012

Chords

We also looked at some chords we could play in the A part of the tune. By using single bow strokes when we’re playing chords, we can add a rhythmic accompaniment to parts of the tune with chords. Using the techniques we looked at in the class last week, it’s possible to have fine control over whether you play a chord or not on each individual note.

Bow hold

We looked again at our bow holds. By using the thumb as a pivot, pushing down on the stick of the bow with the first finger will add pressure to a bow stroke. We tried out using this to increase the volume in a note, and to add a bit of a  ‘scrunch’ to the quality of the note’s sound. It can also be used to create chords (see last week’s post for details). We also tried out using a little pressure on the pinkie to take a little of the bow’s weight off the string. Doing this will reduce the volume of a note. With a little practice, we can develop the ability to create quite a range of sounds using these 2 methods when playing tunes on the fiddle. The 2nd and 3rd fingers will stay in position, helping to control any lateral movement of the bow, and preventing it from sliding off at an angle across the fiddle strings.

We finished the evening by playing through the 3 tunes we have learnt so far this term.


Playing polkas with bounce

Playing polkas with a bounce

Tonight we learnt Bill Sullivan’s Polka, and spent the evening working on techniques for playing polkas with a ‘bouncy’ rhythm. We were using our first finger to push down into the notes, allowing the bow to bounce just clear of the string in between notes in the tune.

Playing polkas with bounce on the fiddle
Photo ©Ros Gasson

We also played around with a chord version of the B part of the tune – it can be played as a variation on the tune, or as an accompaniment along with the tune. We tried experimenting with different rhythms.

We worked on technique for playing chords within the tune in the A part. We were playing an open A along with parts of the tune that were played on the D string. We tried out playing the tune on the D string while keeping the bow just clear of the A string, but very close to it. By pushing down on the stick of the bow with the first finger, the bow hairs  are compressed so they also touch the A string. This can be done without changing the angle of the bow on the strings at all, and allows a lot of control over which of the notes in the tune the chords are played on.

We played through several tunes at the end of the class – Road to Banff, Leaving Brittany, The Eagle’s Whistle, and finished off playing through Lay Dee at Dee.

How to play notes cleanly on the fiddle

How to play notes cleanly on the fiddle

At the end of last week, we ended up with a question: “How do you play notes that sound crisp on the fiddle?” We looked at some techniques we can learn that will help with this, in the class tonight. We started off by thinking about what it is about the sound of musical notes that makes them sound crisp and clean to the listener. Some ideas that came up included:

  • the notes are in time
  • the notes aren’t rushed
  • the notes have a definite start and finish
  • there’s a ‘shape’ to the notes
  • there might be a small gap between one note an the next
  • the notes are expressive
  • the notes have a good tone, creating a sound that’s pleasing to listen to

We used the tune we learnt last week to look at some of these attributes. We started off by talking about learning how to play at a steady tempo. Becoming confident that you can hold a tune at whatever tempo you wish to play it is a skill that can be learnt over time.

It can be useful to try to play along with a metronome. If you’re doing this, and you tap your feet while you play, it’s helpful understand what’s happening with your foot tapping before you try this out. If your playing follows the tempo that your foot is tapping, you’ll need to work on tapping your foot in time with the metronome in order to be able to play in time with it. If on the other hand, your foot tapping is following your playing tempo, then you can aim to match your playing directly to the metronome’s speed.

How to play notes cleanly on the fiddle
Photo ©Ros Gasson 2013

In the class, we tried out starting off playing the tune at one tempo, then moving to a new tempo at the start of each tune part. The group was following one person for this exercise. Initially we found that although we all changed quickly to the new tempo, there was a tendency to immediately slide back towards the previous tempo we’d been playing at. We were also working on tapping our feet while playing, to help with establishing the beat.


Playing with ‘bounce’

We then went on to work on using the vertical action of the bow in the bow stroke, to create ‘lift’ in a run of notes. As we draw the bow across the strings, the bow can be slightly compressed downwards, by using the first finger on the back of the stick to transfer the weight of the arm into the bow. Releasing this pressure part way through the bowstroke will make the bow ‘bounce’ out of the  end of the bow stroke. By varying the pressure applied, and the point at which we release that pressure, it’s possible to vary the slight gap in between successive notes, created when the bow lifts just clear of the string.

We concentrated on the B part of the tune, and tried out using bowing patterns to create emphasis on the beat. The Shetland style ‘1 down 3 up’ bowing pattern can be used on the runs in this tune to great effect.

We also had a go at using chords to create emphasis. In the A part we have already tried out creating a percussive chord on the beat, on the opening D in the tune. This week we tried playing a chord in the B part, playing the D and F# (on the E string) together. We played these on the offbeats in the string-crossing section at the start of the B part.

We tried out using various bits of technique together to create a different effect. On the opening D of the tune we used increasing bow speed, hammer on plus a chord with the open D below, to create crescendo in the note, giving it a ‘shape’.

To finish the class we played through Cooley’s Reel together.

Next week we’ll learn a polka, which will give us a chance to do some more work on developing those crisp notes!


Learn to play the fiddle

Learn to play the fiddle

The String Circle fiddle class met for the first night of term this week. We’ll be learning various aspects of fiddle technique throughout the 12 week term.

Tonight we learnt the Shetland reel Lay Dee at Dee. We looked at bowing, and  tried out slurring 2 notes either before or after the crotchets in the tune, to keep a bowing pattern with down bows on all the on-beats. In the A part of the tune, we looked at playing a percussive open D along with the Ds in the tune itself. In the B part, we worked on the section with string crossing between the A and E strings.

We tried out using a circular wrist action to get the bow crossing from one string to the other. To do this effectively, you need to play the notes a little further up the bow than your usual playing position. The weight of the bow can then be used to allow the bow to tip over from the E string and onto the A  string.

We also tried out playing up and down a D scale, while thinking of something unrelated to what we were doing. We were aiming to allow the playing to be taken care of by the subconscious part of the brain. It’s worth trying this out at home. Try playing something you are really familiar with ( a scale, or riff, or a tune you know really well). Find something to watch that will keep you absorbed – looking out of the window, if there’s something happening outside, or watching the tv with the volume turned down might work. Playing round your chosen piece, while getting your conscious brain absorbed in something else, will mean that the subconscious will have to take over dealing with playing the fiddle. This will give you an idea of how it feels to play in a way that will allow the music to flow more naturally. When we first start to learn to play the fiddle, the conscious thinking part of the brain takes over. As we play, we’re analysing and thinking about everything that goes on, as we grapple with where to put the bow, which finger is going down next, whether we are playing in tune and in time, and a myriad of other details. The overall action of playing doesn’t flow well when the brain is working in this way. It’s similar to when we learn a skill such as reading – in the early stages, when we read out loud, the words came out in a rather stilted way, as we were having to consciously work out what each word on the page was. As we became more familiar with the shapes of common words, we learnt to read more fluidly, from the subconscious rather than the conscious.

We talked a bit tonight about effective ways to practice. Here’s a link to the blog post I mentioned about practicing without your instrument. There are loads more interesting blog posts on the same website, covering all sorts of aspects of the psychology of music, playing and learning.

Next week we’ll do some more with the tune we learnt tonight.

Slurring notes over bar lines

Playing slurred notes over the bar lines

Play slurred notes over bar lines to add swing
Photo ©Ros Gasson

Tonight we learnt an unusual jig written by the fiddler Sarah Northcott. Sarah wrote the tune for a couple of friends from Brittany, for their wedding day. It’s called ‘Anne et Ludo’. It’s a quirky tune, with notes slurred over the bar lines in both the A and B parts. We worked on speeding the bow up on the second of the slurred notes, which falls at the start of the bar, to emphasise it. This helps to keep a steady rhythm throughout the tune.

We also played through The Shetland Molecule a few times, and reminded ourselves of some of the bowing patterns we tried out last week.

At the end of the night we played through several tunes we’ve learnt in the last two terms:  the Aird Ranters, The road to Banff, Vals, Leaving Brittany, Break your Bass Drone, and the Eagle’s Whistle.

This was the last class of the summer term. We’ve covered a lot of topics, with a focus on using bowing to play around with rhythms in a tune.

The autumn term starts back on Tuesday 10th September. Details are on the website home page.


Bowing patterns in reels

Bowing patterns for playing reels on the fiddle

Tonight we spent some time working on developing a basic pattern for bowing reels, and also looked at a couple of variations for this, to shift the emphasis from the beat to the off beat.

Learning how to control the bow
Photo ©Ros Gasson 2013

We started off by playing through some bowing exercises for reels. We played up a D scale, playing each note twice, using single bows. If we start on a down bow, each full scale becomes the equivalent of 2 bars played in reel time. When all the notes in the pattern are quavers, playing a simple pattern of alternating down bows and up bows will always bring us back to a down bow on each on-beat and off-beat in the tune. If we add either a crotchet or a triplet into the notes, we need to slur two notes to get our bow back into the ‘down bow on the beat’ pattern. In the exercise we worked on slurring the two notes immediately after the crochet or triplet.

We learnt the reel ‘The Shetland Molecule’ by John McKusker, and worked on slurring 2 quavers together after each triplet or crotchet in the tune. Once this bowing pattern was established, we tried varying the pattern in a few places, to move the emphasis onto the off beat.

We revisited our bow hold, looking at the importance of keeping the bowing fingers, hand and arm relaxed. It’s particularly important to make sure that the thumb is slightly bent throughout the bowstroke, to prevent tension creeping into the bowing arm.

At the end of the evening we played through Jig Runrig and the Road to Banff

Bowing patterns and grace notes

Bowing patterns and grace notes

Tonight we worked on bowing reels with a down bow on the beat. We’re aiming to develop a ‘default’ bowing pattern, so that we can play reels emphasising the on beat naturally, and completely subconsciously. Once this pattern is ingrained, it becomes much easier to learn techniques and bowing patterns that will enable us to play around with rhythms in the tune.

Bowing reels

We looked at Coolies Reel as an example. Each time there is a crotchet or triplet in the tune, we slurred the following 2 quavers. (It’s possible to slur the preceding 2 quavers instead, if you prefer).

We also looked at an option for adding an extra slur in the B part, to push the emphasis onto the offbeat.

Grace notes

Bowing patterns on the fiddle
Photo ©Ros Gasson

Grace notes and rolls have a percussive effect on a note in a tune. Although often written as playing extra notes, you don’t hear grace notes as individual notes. They are an embellishment of the note in the tune. A simple grace note acts by briefly stopping the string from vibrating. You can use the finger above the note, or the 2nd finger above the note to create a simple grace note. The hand needs to be really relaxed. The finger action is a very short tap on the string, and is just enough to stop the string vibrating for a moment.

Rolls

Rolls have more fingers involved! They can be played as 5 or 4 note rolls. As with grace notes, once you can play these fluidly, you won’t hear any of the individual notes of the ornamentation. When you’re first starting to learn to play a roll, you will play the note (already in the tune), followed rapidly be the note above, the note itself, the note below, and back to the note in the tune. For a 5 note roll on a B (played with the first finger on the A string), the fingering for this would be 1-2-1-0-1. A 4 note  roll starts on the note above the note in the tune (fingering 2-1-0-1 if played on a B). Rolls on an open string can be played 0-1-2-1-0.

Chords

Playing with relaxed hand – we tried out playing with a very light bow hold, holding the bow  with just the thumb and first finger. It’s possible to play the whole tune like this, as long as we don’t try to lift the bow off the strings at any point. This is purely an exercise! It gives an idea of how little pressure you need from your 3rd & 4th finger, and pinkie, while playing most of the tune. Those fingers are generally relaxed, and laid over the bow, giving it a bit of stability during the bow stroke, and keeping the bow running in a straight line, perpendicular to the strings. The pinkie will be used a lot more if we’re lifting the bow off the strings.

We worked on techniques for playing chords in the tune. If we’re playing part of the tune on the A string, and want to create chords on the D string, we can make this much easier by keeping the bow as close as possible to the D string throughout the bow stroke. When we want to include a chord, a small bit of pressure on the stick of the bow will then be enough to bring the bow hairs in contact with the D string as well.

We also tried out playing an open A, with a more percussive style of chord on the open D, on each down bow. Playing close to the heel on the up bow results in there being plenty of weight in the tip of the bow at the top of the bow stroke. Keep a little bit of pressure on the heel of the bow with the pinkie during the up bow. At the top of the up bow stroke, release the pressure with the pinkie, which allows gravity to drop the bow briefly onto the D string just as the bow direction changes.

At the end of the evening we played through Brenda Stubbert’s Reel, then Captain Campbell (Strathspey) followed by Coolie’s Reel. We ended off with the Eagle’s Whistle.


Learn to play reels faster

 Learn to play reels faster

Learn to play reels faster
Photo ©Ros Gasson

At the start of term several people in the class asked about learning to play tunes faster. Reels are often the tunes where speed is a problem, particularly if you want to be able to play for dancing. There are several aspects to learning to play reels faster – being able to get your fingers around the notes is one of them, but generally not the thing that is tripping folk up when they are learning. Having techniques that enable you to keep a steady rhythm with the bow is crucial – if the tempo and rhythm stay strong, straying off the tune doesn’t necessarily cause a problem. If the notes are right but the tempo or rhythm falters, the musical spell is definitely broken! Having our bowing under control will allow us to develop a strong beat in our playing. Learning to hear the tune in our heads as we play (whether or not we’re playing the tune!) allows us to move away from concentrating on fitting in individual notes, and to focus more on the rhythms and patterns within the music. It will allow the conscious brain to give up being in control, letting the subconscious take charge This is when we can experience the ‘flow’ state, where we’re open to developing a more fluid way of playing.

We learnt Cooleys reel, which is an Irish tune that sounds great at a good pace. We’ll spend some time working on this tune as a way to look at some of the things we can do to start playing reels faster and with confidence.

Once we’d learnt the tune we looked at what’s happening with the bowing. One thing that can make an enormous difference to being able to play tunes well at speed is having a basic ‘structure’ to the way we will bow a tune. We’re aiming to develop an underlying pattern that will naturally emphasise the beat (so generally we’d be playing a down bow on the beat). In these early stages, we’re also looking for ways to make it as easy as possible to get our bow around the tune. Once the basic pattern is ingrained, you’ll play new tunes with that pattern without thinking about it. At that point, you can turn your attention to adding different bowing patterns to tunes at points where you want to vary the rhythm away from emphasisng the beat.

Developing a basic pattern to our bowing also means that when we first learn a new tune, each time we play it we’ll be playing it with the same bowing pattern. Doing this greatly reduces the amount you need to learn to play that tune well. If you have no idea what direction your bow is going in, the chances are that each time you play the tune, your bowing pattern will vary, which makes it a much more complicated job to learn to play the tune with complete confidence.

We worked on starting the reel on a down bow, and playing a down bow on each on beat in the tune. For reels that are all quavers, if you wanted to establish this basic bowing pattern, it would work fine to play every note on alternating down and up bows – we’d always end up palying a down bow on the beat. Not many reels are that simple! Crotchets or triplets will disrupt the flow of up and down bows, unless we find a way to bring the bow back into the basic pattern.

So our basic pattern could involve slurring 2 quavers together either before or after any crotchets or triplets in the bar. Cooley’s Reel is a great tune for working on this, as there are crotchets and triplets in both parts of the tune. I’ve added slurs onto the written music to show where we were playing them in the class tonight.

We’ll do some more work on this tune next week, looking at ways we can vary this basic pattern to add interest to the rhythm. So – shock horror…we’ve ended up with some homework! Feel free to work on being able to play the tune with this basic bowing pattern for the class next week.

At the end of the night we played through Fionn’s and the Eagles Whistle

Consolidating tunes


Consolidating tunes learnt this term

The Arran Boat Song

Learning tunes in the fiddle class, Edinburgh
Photo ©Ros Gasson

We went through the steps for learning to play with vibrato. It helps to practice these regularly for a short time, to build up muscle memory for the movement made by the hand. Keep the left hand and forearm relaxed while going through these steps.

The Eagles Whistle

We worked on the chords, particularly in the first part of the tune. When p[laying the tune in the lower octave, it’s possible to play the entire A part with chords on the G & D strings. It’s important to find ways to break this up, and give some ‘breathing space’ in between chords. Also vary between percussive & drone style chords.  We tried playing without looking at our fingers, and even while walking around the room, to help us shift into a more intuitive and fluid way of playing.

Kilfenora Sexy jig

We played the dotted jig rhythm,  emphasising the notes on the beat (the 1st note of each set of 3 quavers). Tapping the foot on the beat really helps with this. We also played around with playing any old note while  keeping that jig rhythm going.

We went over the notes in the run down at the end of the 2nd B part. We also tried out the slide on the C# at the start of the tune, along with the chord & hammer o.

Rocking the Baby

We split in two and tried playing the A part of the tune against the B part. We also had a quick chat through the technique for playing jigs that repeatedly cross strings – using  short bows, emphasising on the beat, and using a wrist action in figure of 8 pattern.

At the end of the evening we played Barrowburn, Leaving Brittany, Campbell’s farewell to Redcastle, …and the Eagle’s Whistle again.